Infinite zoom with Stable Diffusion
Some of you might have already seen these great animations, where someone infinitely zooms in or out an image and it seems like it has no end. Until now, it has required a lot of artistic work to make this happen. Fortunately, with the recent advancements in Generative AI, especially in the computer vision domain, we can generate them on our own, with just a few lines of code.
Disclaimer: in this post, I won’t explain the details of the Stable Diffusion itself. There’s already a lot of great content in the Internet to start with. Personally, I can recommend the fast.ai course1 or the original paper2.
Inpainting and outpainting
To start with, let’s explain what inpainting and outpainting is, as this is going to be the core components of our solution.
Given an image and a binary mask, we want to replace the content of the image behind that mask with something else. Obiously, we want the final image to still be consistent with the untouched regions. This is called inpainting.
Outpainting is a special case of inpainting, when the mask surrounds e.g. an object and we’re interested in generating a scene around it. This is going to be our case here.
Stable Diffusion
As the title of this post suggests, we’re going to use Stable Diffusion as our painter.
Stable Diffusion is a family of generative models based on the latent diffusion mechanism. These models allow us to generate a broad range of images, given just a textual description of what we want (prompt).
Under the hood, it’s a diffusion process happening in the latent space, so we use Variational Autoencoder (VAE) to calculate and restore latents. For conditioning, there’s cross-attention inside the denoising UNet.

Inpainting using Stable Diffusion
We’ll be using stabilityai/stable-diffusion-2-inpainting model here,
which conditions the generation process on three inputs to generate an inpainted image:
- an image,
- an inpainting mask,
- a prompt.
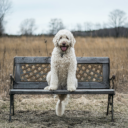
Let’s start with our first image. For this, we can use either our own image, or we can generate one using Stable Diffusion. We’ll do the second thing.
Usually, we would use a non-inpaiting pipeline for this, but to save memory, we can simply trick the inpainting model to completely inpaint an empty image:
blank_image = Image.new("RGB", (size, size), (0, 0, 0))
mask = Image.new("RGB", (size, size), (255, 255, 255))

initial_image = pipe(
    prompt=prompt,
    negative_prompt=negative_prompt,
    image=blank_image,
    mask_image=mask,
    num_inference_steps=num_inference_steps,
    guidance_scale=cfg,
    generator=generator,
).images[0]
That’s what I got after a few trials:
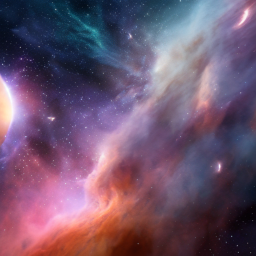
This looks like a good start.
Actual inpainting (outpainting)
You might have already figured out, how are we going to utilize the inpainting model to create an infinite zoom animation. If we can outpaint one image, and generate more story, we can repeat the process as many times as we want. Then, it is just a matter of smart resizing and croping the images.
There are many ways we can outpaint an image. We’ll focus on two of them.
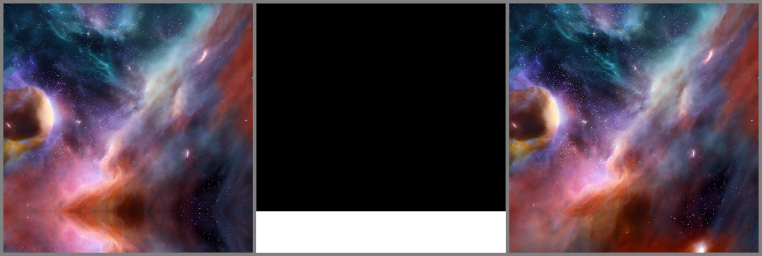
The first one is called the direct one. In this approach, we directly outpaint the reference image from all sides at the same time.
To do that, we need to first pad the image by the outpainting_size (128 in my example),
then set the mask for the padded region and run the inpainting model.
It’s important to set the correct padding mode - symmetric or reflect will do,
as the region under the mask influences the inpainting process.
In my experiments, I found out that if we pad it with black pixels, we’ll likely
end up with some kind of a frame in the outpainted image.
However, this might be sometimes desirable.
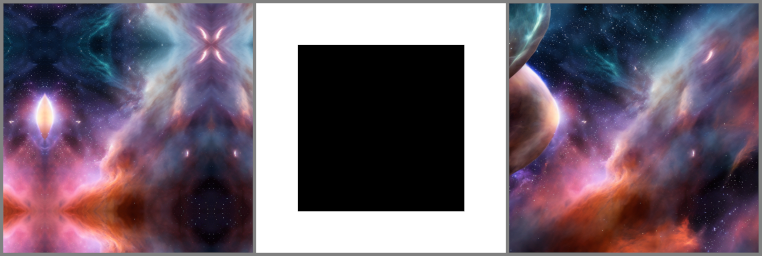 (left: padded image, center: mask, right: outpainted image)
Here’s the code for this method:
def outpaint_direct(
    initial_image: Image.Image,
    outpaint_size: int,
    generator: Callable[[Image.Image, Image.Image], Image.Image],
) -> Image.Image:
    resize = transforms.Pad(outpaint_size, padding_mode="symmetric")
    image_raw = resize(_to_tensor(initial_image))
    padded_image = _to_pillow(image_raw)

    ixs = torch.arange(padded_image.width)
    mask = torch.zeros_like(image_raw)
    mask[:, ixs < outpaint_size] = 255
    mask[:, :, ixs < outpaint_size] = 255
    mask[:, ixs > initial_image.width + outpaint_size] = 255
    mask[:, :, ixs > initial_image.height + outpaint_size] = 255
    mask = _to_pillow(mask)

    image = generator(padded_image, mask)
    return image
The second method, sequential, seems to produce better results, but it requires 4 generations for a single image. The idea is also very simple: we outpaint the image 4 times, one side of the image every time.
Starting from the left:

Top:
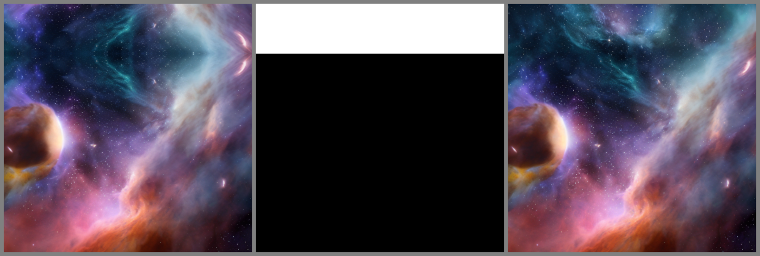
Right:
And to the bottom:
At each step we do the same operations as with the direct method: padding -> mask -> inpainting.
def outpaint_sequentially(
    initial_image: Image.Image,
    outpaint_size: int,
    generator: Callable[[Image.Image, Image.Image], Image.Image],
) -> Image.Image:
    _to_pillow = transforms.ToPILImage()
    _to_tensor = transforms.PILToTensor()

    resize_transforms = [
        transforms.Pad([outpaint_size, 0, 0, 0], padding_mode="symmetric"),
        transforms.Pad([0, outpaint_size, 0, 0], padding_mode="symmetric"),
        transforms.Pad([0, 0, outpaint_size, 0], padding_mode="symmetric"),
        transforms.Pad([0, 0, 0, outpaint_size], padding_mode="symmetric"),
    ]

    def _left_mask(image: Image.Image) -> Image.Image:
        xs = torch.arange(image.width)
        mask = torch.zeros_like(_to_tensor(image))
        mask[:, :, xs < outpaint_size] = 255
        return _to_pillow(mask)

    def _top_mask(image: Image.Image) -> Image.Image:
        ys = torch.arange(image.height)
        mask = torch.zeros_like(_to_tensor(image))
        mask[:, ys < outpaint_size] = 255
        return _to_pillow(mask)

    def _right_mask(image: Image.Image) -> Image.Image:
        xs = torch.arange(image.width)
        mask = torch.zeros_like(_to_tensor(image))
        mask[:, :, xs > initial_image.width + outpaint_size] = 255
        return _to_pillow(mask)

    def _bottom_mask(image: Image.Image) -> Image.Image:
        ys = torch.arange(image.height)
        mask = torch.zeros_like(_to_tensor(image))
        mask[:, ys > initial_image.height + outpaint_size] = 255
        return _to_pillow(mask)

    mask_generators = [
        _left_mask,
        _top_mask,
        _right_mask,
        _bottom_mask,
    ]

    image = initial_image
    for resize, mask_gen in zip(resize_transforms, mask_generators):
        image_raw = _to_tensor(image)
        padded_image = _to_pillow(resize(image_raw))
        mask = mask_gen(padded_image)
        image = generator(padded_image, mask)

    return image
Let’s repeat
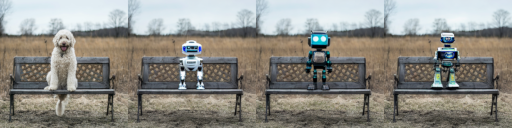
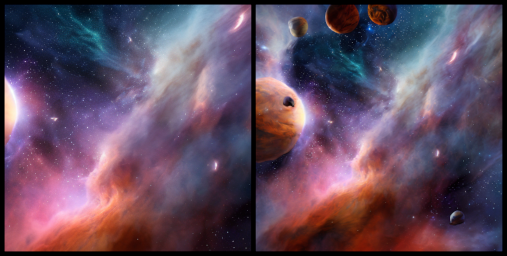
No matter which method we choose, we end up with a pair of images: the original one and the outpainted. But for the animation we need more than two images. Let’s repeat the process a few times, remembering to scale the image back to original resolution after each outpainting:

Looks good! We can turn it into an animation right away, but it won’t be smooth:
Can we do better?
Adding interpolation
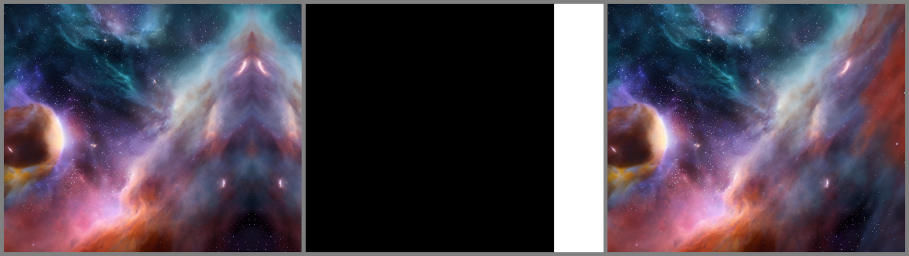
Let’s head back to having two frames only:
 (left: initial image, right: outpainted image)
For the zoom-out effect, we want the previous image to become smaller and towards the middle of the image, while the next image starts appearing at the edges of the image. The image size, however, must remain fixed.
I came up with the solution below. It’s not perfect, as we can see some artifacts in the animation, but I think it’s sufficient for a hobby project.
def interp(
    src: Image.Image, dst: Image.Image, step: int, num_interps: int
) -> list[Image.Image]:
    width, height = src.size
    # During outpainting we increased the image size by `step` on every side,
    # so now we need to know the margin after resizing to 512x512.
    inner_step = (step / (width + 2 * step)) * width

    frames = []
    for i in range(num_interps):
        canvas = Image.new("RGB", (width, height), (0, 0, 0))

        padding_src = round(i * (inner_step / num_interps))
        padding_dst = step - round(i * (step / num_interps))

        src_s = width - 2 * padding_src
        dst_s = width + 2 * padding_dst

        resized_src = src.resize((src_s, src_s))
        resized_dst = dst.resize((dst_s, dst_s))

        canvas.paste(resized_dst, (-padding_dst, -padding_dst))
        canvas.paste(resized_src, (padding_src, padding_src))

        frames.append(canvas)

    return frames
And here’s the animation with 16 steps of interpolation between frames:
It’s not a perfect solution, as I see two artifacts:
- color shift, probably due to the interpolation while resizing,
- sometimes there’s a frame visible in interpolated frames.
Nevertheless, the effect is great.
Here are more examples:
You can find the complete code, along with a Gradio app, here. I strongly recommend running this using a GPU. I usually use A40 instances on RunPod for this, paying less than $1/hr. If you’d like to try it yourself, and you find this post useful, please consider using this reflink.